CrowdSec Cloudflare Worker Bouncer

📚 Documentation 💠 Hub 💬 Discourse
We recommend using the Self-Hosted Installer setup method for most users. It is simpler to install and maintain.
For comparative details, see the Setup Methods section below.
Jump directly to the Setup section for your preferred method:
Self-Hosted Installer (Recommended)
CLI Bouncer Daemon
Direct link to generate the necessary Cloudflare token needed for this bouncer: Cloudflare API Token
Overview
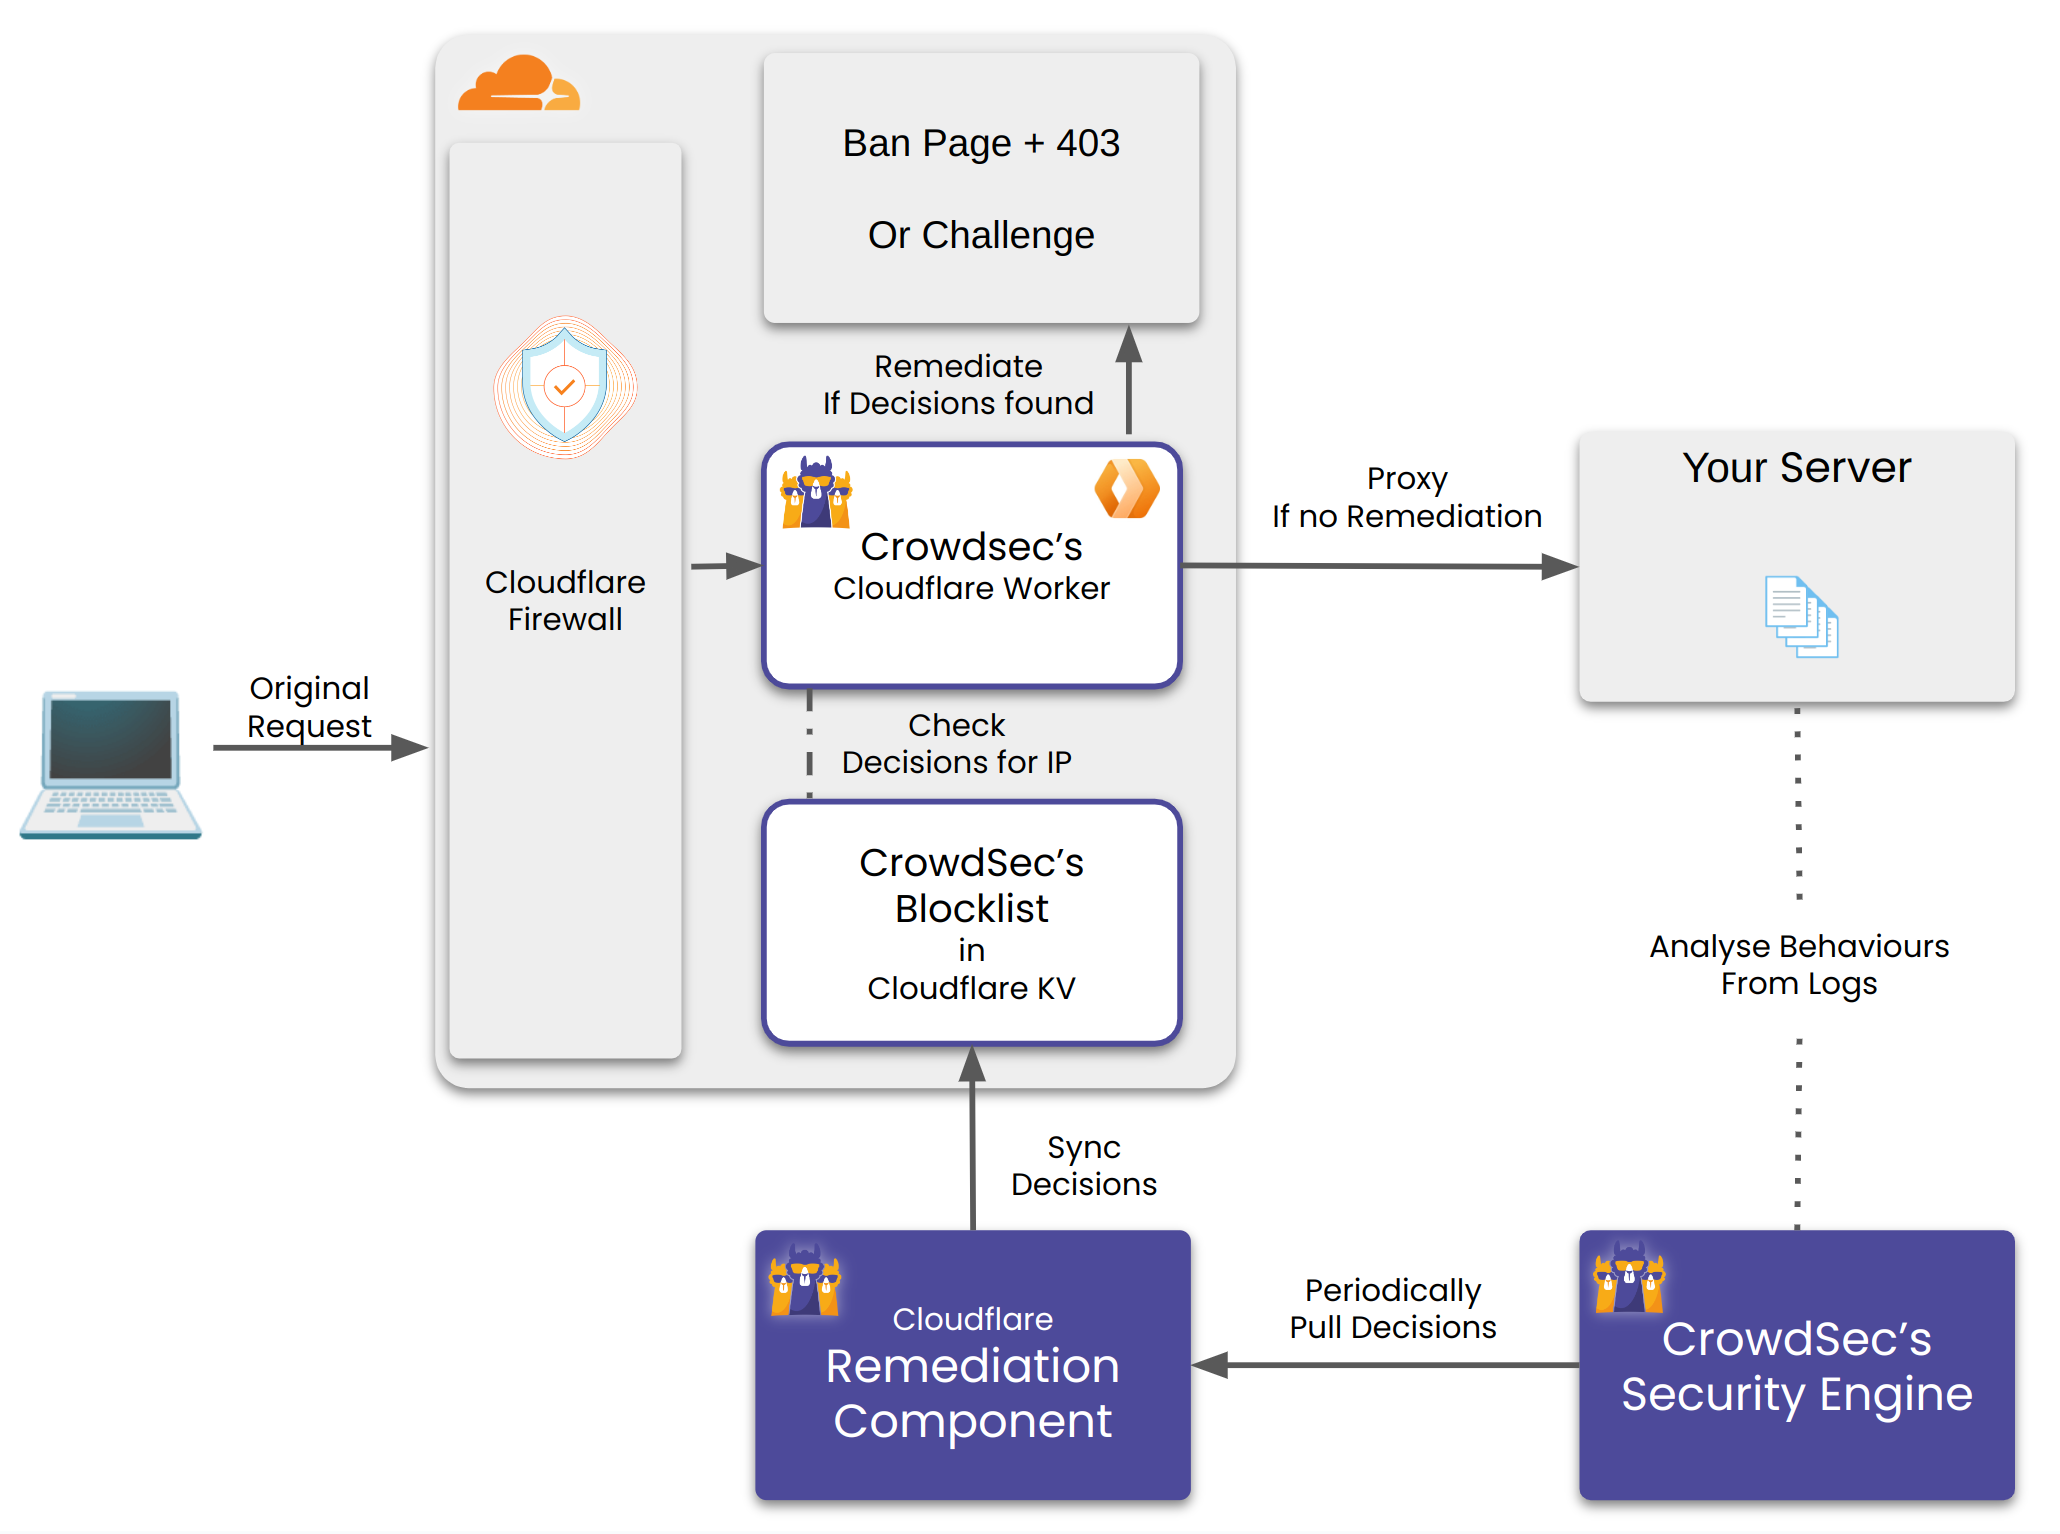
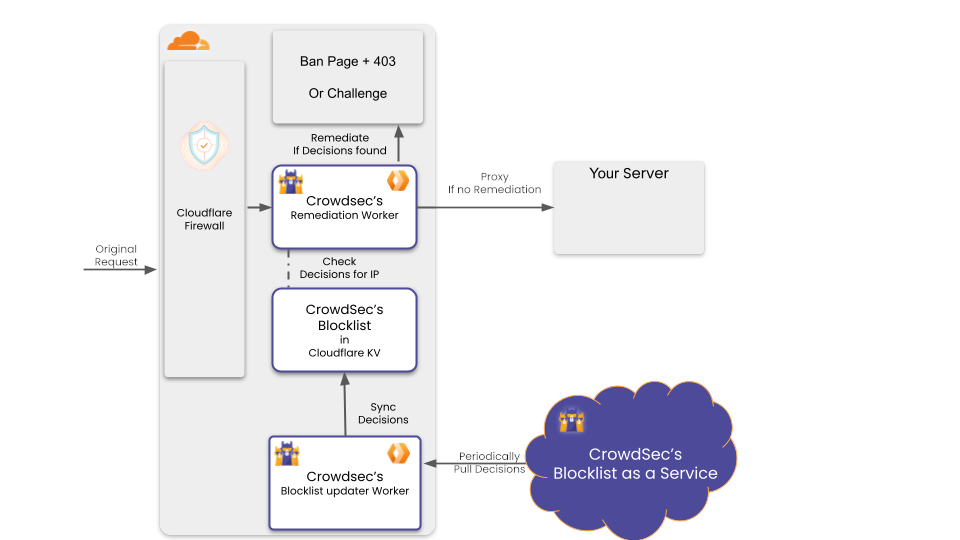
This Remediation Component uses Cloudflare Workers to block or challenge incoming traffic on your Cloudflare zones.
How it works:
- A list of IPs to remediate (aka decisions) is stored in a Cloudflare KV store, each IP associated with an action, either:
- Ban (hard block with a custom HTML page)
- Captcha (Cloudflare turnstile challenge)
- This list is kept up to date either by:
- A Sync Worker that periodically fetches decisions from CrowdSec.
- An installed bouncer script that pushes decisions to the KV store via Cloudflare's API.
There are two ways to deploy this bouncer:
- A fully Self-Hosted version with a browser-based Install&Config GUI (recommended)
- A daemon CLI Bouncer running beside your Security Engine or as a standalone process.
Where do the IPs come from?
The source of those decisions
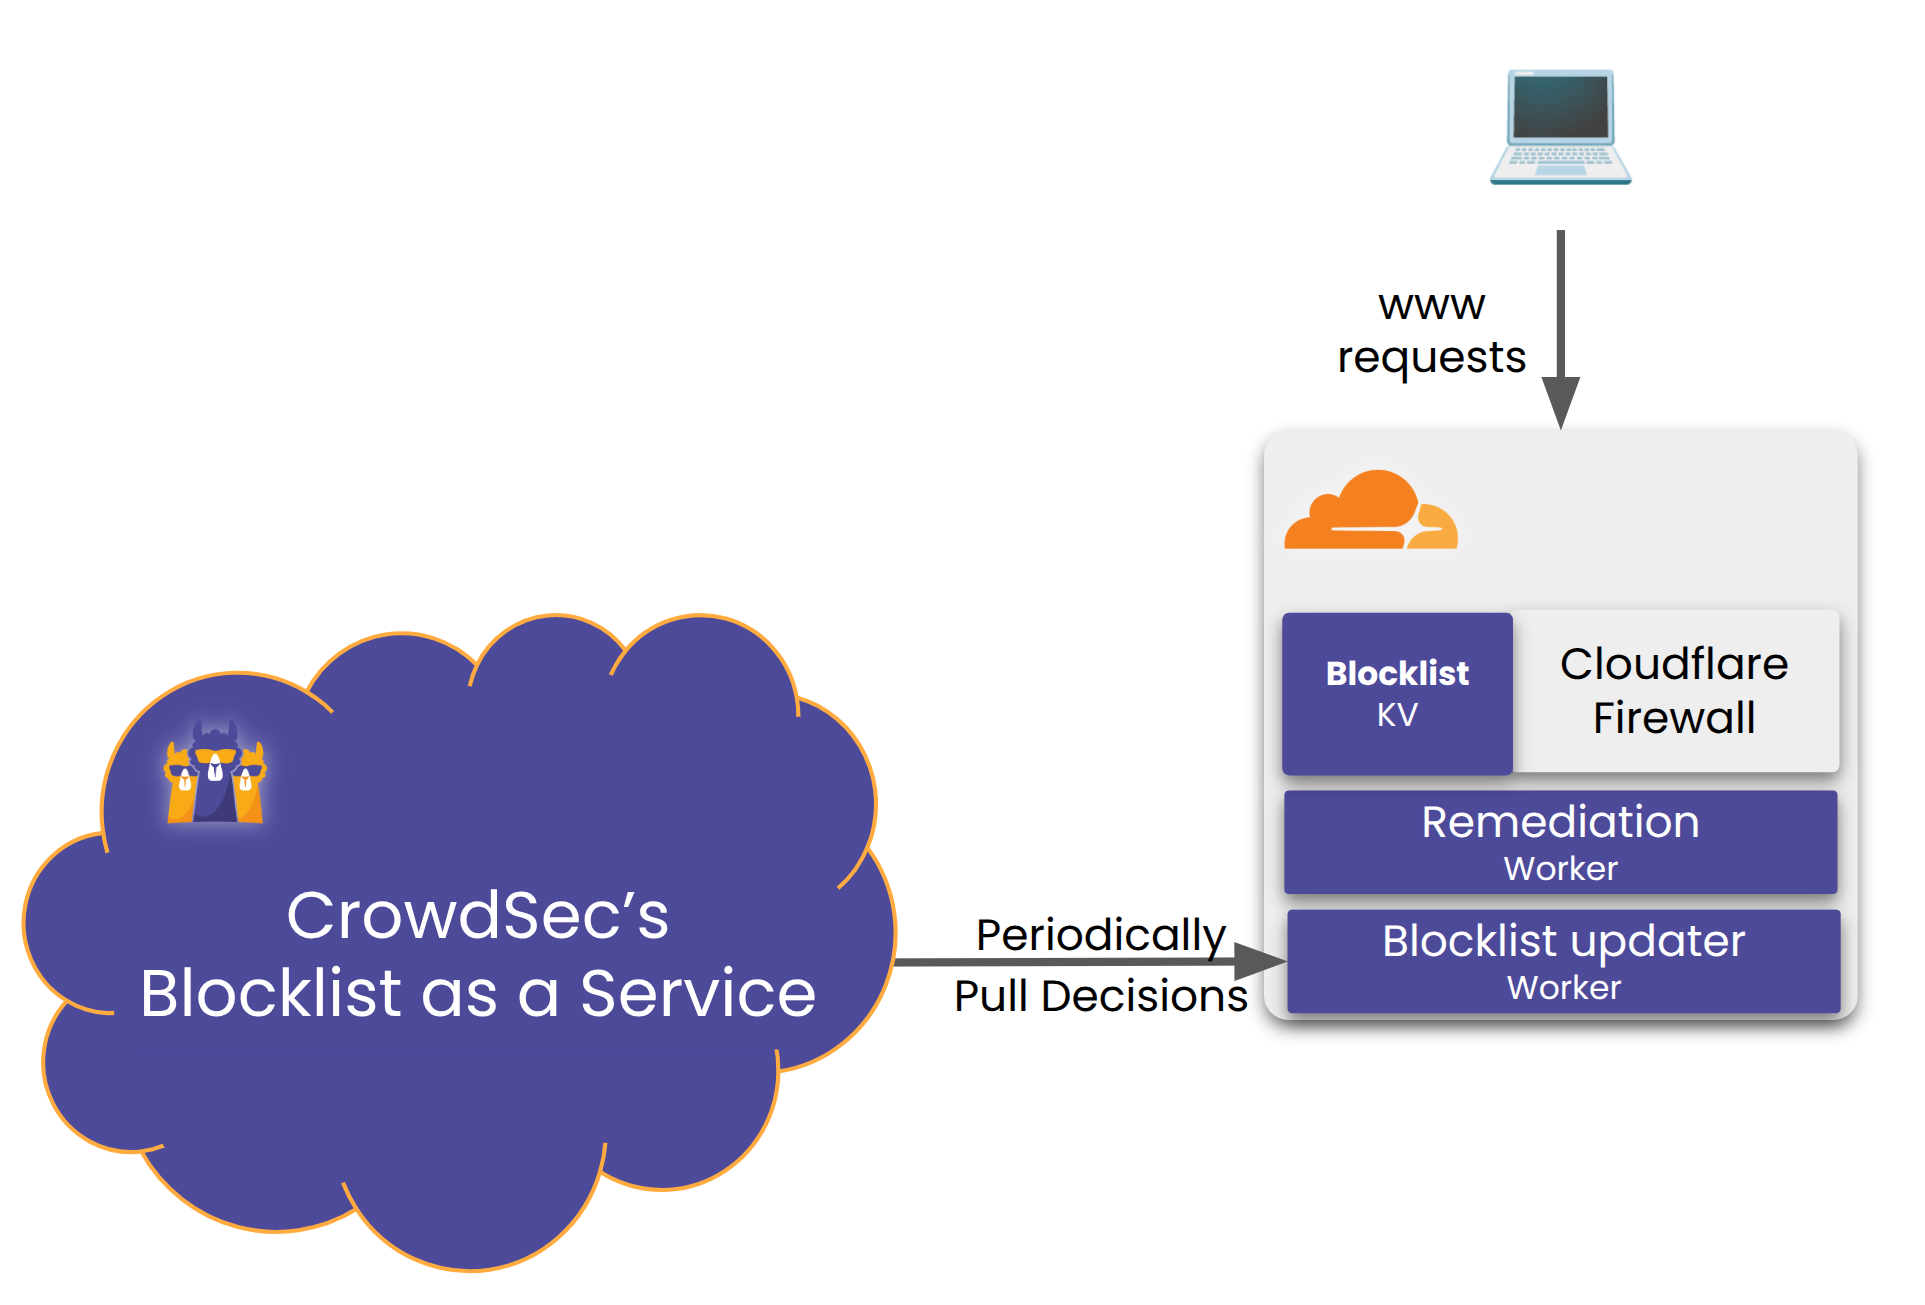
- A Blocklist Integration Endpoint: a URL served by CrowdSec, no infrastructure required on your side. This is the simplest option.
- A Security Engine you run in your own infrastructure: the Sync Worker connects to your LAPI to pull decisions directly.
This Remediation Component relies on Cloudflare Workers and the KV store. It works best on a paid Workers subscription. See Appendix: Cloudflare Free Plan for details.
Setup Methods
There are two ways to deploy this bouncer. Both end up with the same Remediation Worker and Sync Worker(*) running inside your Cloudflare account.
- Self-Hosted Installer (Recommended)
- Best For: Blocklist Integration setups, minimal footprint, no server to maintain.
- Setup: WebUI, no YAML files, no daemon.
- CLI Bouncer Daemon
- Best For: Security Engine setups, Prometheus metrics, advanced/IAC configuration (multiple instances, custom resource names).
- Setup: YAML config file, command-line flags, runs as a daemon or one-shot process.
Here's a quick comparative overview:
| Self-Hosted Installer | CLI Bouncer Daemon | |
|---|---|---|
| Initial install | Github Cloudflare integration | Host-based package install |
| Setup | WebUI | config.yaml auto generation and manual edits |
| Decision source | CrowdSec Blocklist Integration or Security Engine | CrowdSec Blocklist Integration or Security Engine |
| Decision sync | Sync Worker | Bouncer daemon or possibility to use Sync Worker |
| Metrics | Cloudflare Analytics Engine Queries | Prometheus metrics & pushed to CrowdSec Console |
| Auth to decisions source | Basic Auth | Basic Auth or MTLS |
After installation, configure the Worker Route Fail Mode to FAIL OPEN to avoid service outages if the worker encounters errors or Cloudflare plan quota overruns.
Cloudflare API Token
Both setup methods require a Cloudflare user API token with the following permissions.
Click 🔑 this link to open the Cloudflare token creation page with the required permissions pre-selected, or create one manually at Tokens with:
| Permission Group | Item | Permission |
|---|---|---|
| Account | Turnstile | Edit |
| Account | Workers KV Storage | Edit |
| Account | Workers Scripts | Edit |
| Account | Account Settings | Read |
| Account | Account Analytics | Read |
| User | User Details | Read |
| Zone | DNS | Read |
| Zone | Workers Routes | Edit |
| Zone | Zone | Read |
By default the token is scoped to all accounts and zones you have access to. We recommend scoping it only to the accounts and zones you intend to protect.
Each configured zone must have at least one A or AAAA DNS record. Zones with only CNAME records should be excluded from the scope — the bouncer tries to ignore them automatically, but failure to do so may result in higher KV storage charges.
Self-Hosted Setup
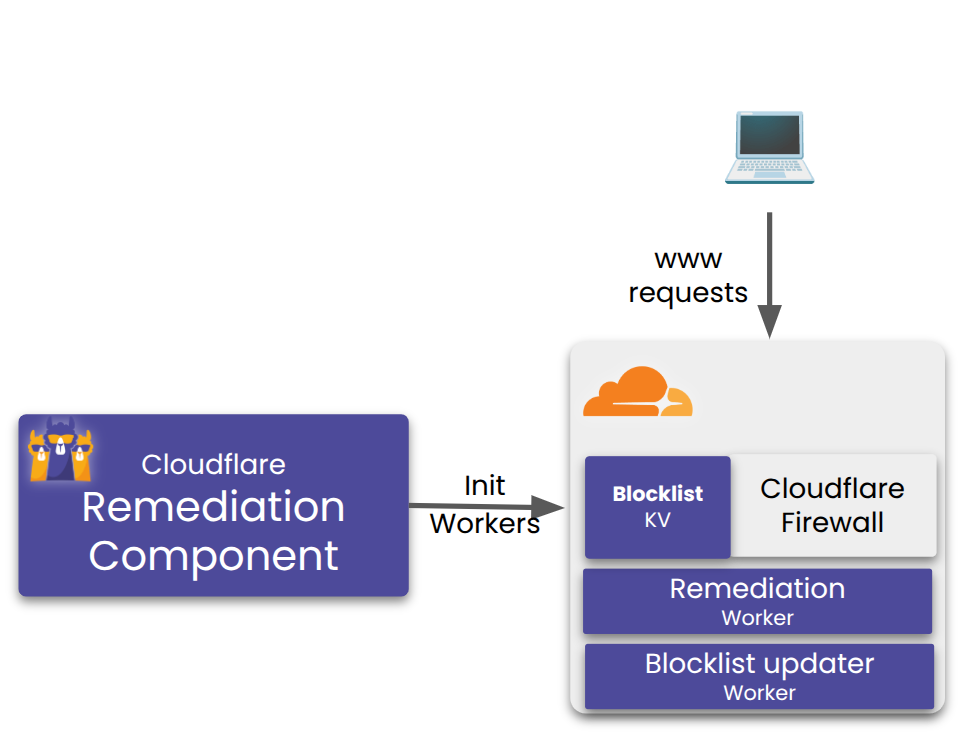
The self-hosted setup uses a Cloudflare github integration to deploy a worker acting as the central install and configuration GUI for the Cloudflare bouncer elements.
The steps are:
- Deploying the Installer Worker to your Cloudflare account via GitHub or Gitlab
- One time action
- The installer will update automatically when the repository is updated
- Installing the bouncer and binding your zones via the Installer GUI
- Easy One click or batch actions on you select zones
- Easy install/cleanup process
Everything runs inside Cloudflare. No server, no daemon, no YAML files.
Deploy the Installer
Click the button below to clone the installer into your GitHub or GitLab account and deploy it as a Cloudflare Worker:
The Cloudflare deploy flow forks the repository into your GitHub or GitLab account before deploying — you need an account on one of these platforms.
Once deployed the Installer Worker will appear in the Workers & Pages section of your Cloudflare dashboard.
Cloudflare gives you the URL of your Installer Worker. Open it to reach the installer GUI.

Configure via the Installer UI
Click on your Installer Worker URL to open the installer GUI.
The UI is a three-step wizard. Work through each section top to bottom.
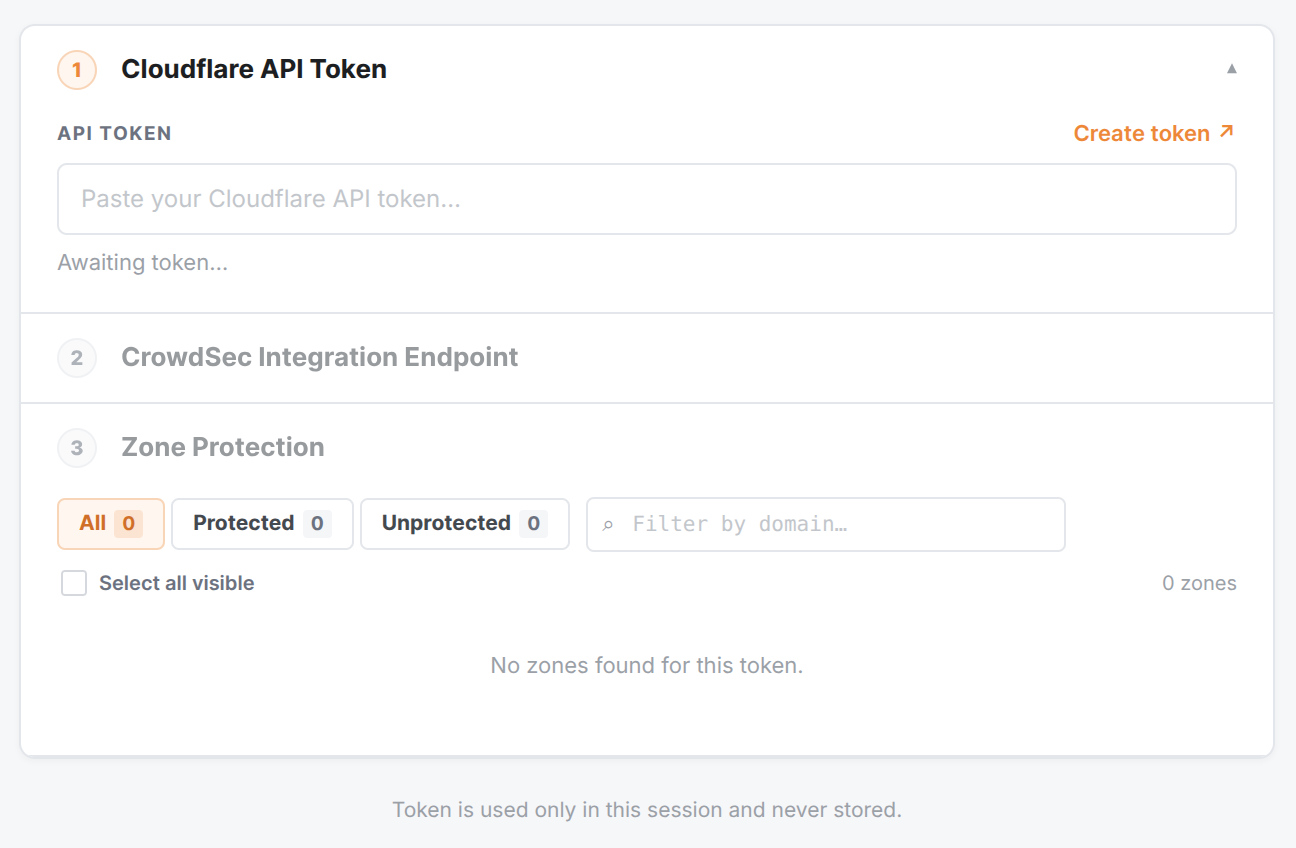
Step 1 — Cloudflare API Token
The Installer never stores your API token or credentials. They are held only in your browser session. If you don't have a token yet, click Create token ↗ in the UI. (see Cloudflare API Token above for the permission list).
Paste your Cloudflare API token. The installer validates it immediately and confirms all required permissions are present.
Upon validation, the installer fetches a list of all zones in your account and their current protection status.
In the following step, you can then select which zones to protect.
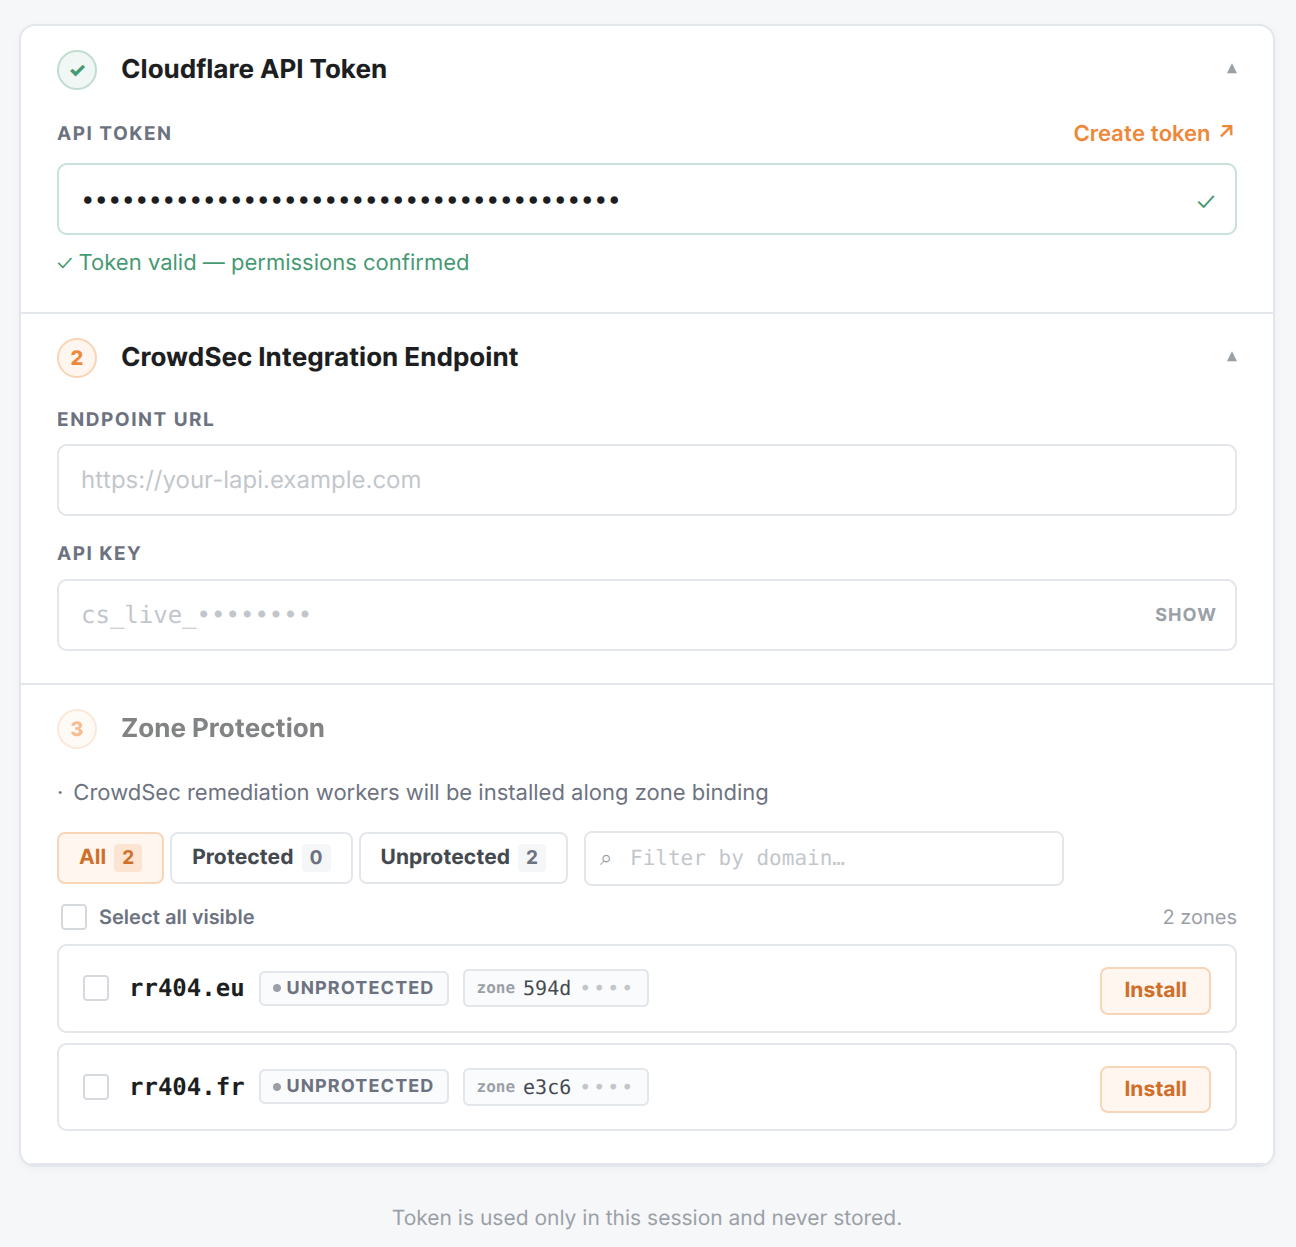
Step 2 — CrowdSec Integration Endpoint
Paste the URL of your CrowdSec decision source:
- Blocklist Integration Endpoint — from the CrowdSec Console under your Remediation Component integration.
- Security Engine LAPI URL — the URL of your self-hosted LAPI, reachable from Cloudflare's network. And API key generated for the bouncer.
If you had a previous installation, the installer will pre-fill the field with the currently saved endpoint.
You can edit it to change the endpoint without reinstalling by clicking edit and then update now.


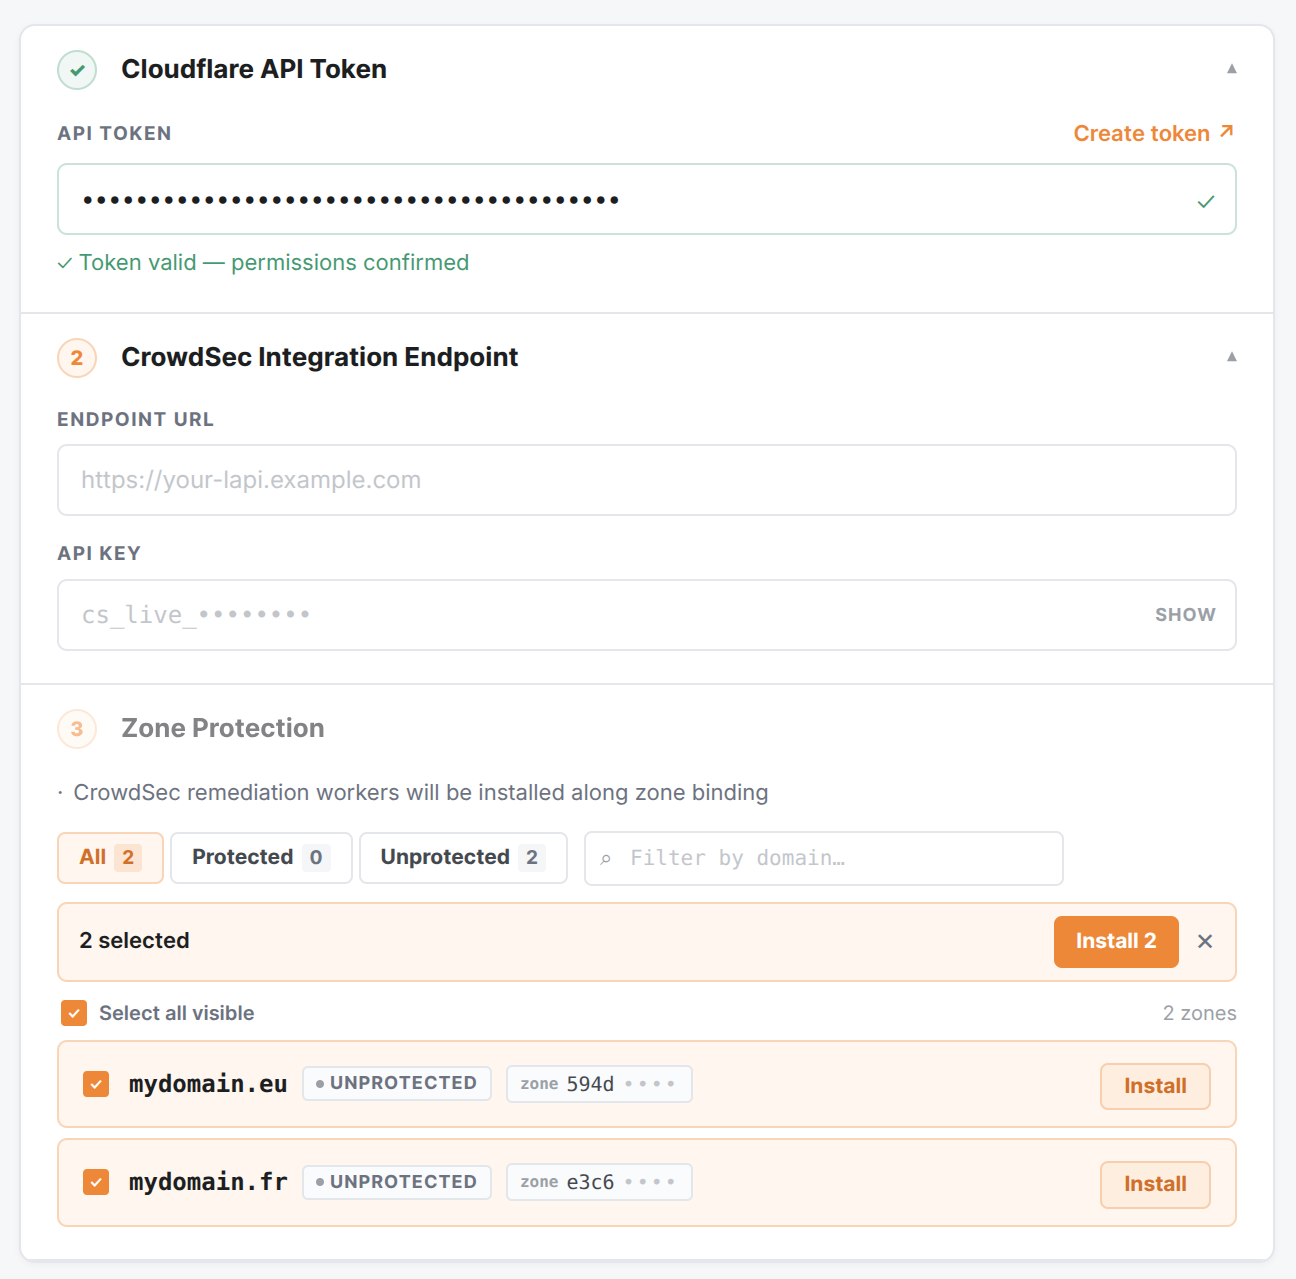
Step 3 — Zone Protection
This section lists every zone in your Cloudflare account with its current status.
Installing a zone:
You can install/uninstall individual zones or select multiple zones for batch install/uninstall.
Turnstile (CAPTCHA):
On installed zones you can activate the ability to have CAPTCHA decisions handled.
Toggle Supports CAPTCHA on a zone enable a style of Turnstile for it (managed, non-interactive, invisible). Protected zones with Turnstile show a SUPPORTS CAPTCHA badge. You can toggle it on or off after installation as well.
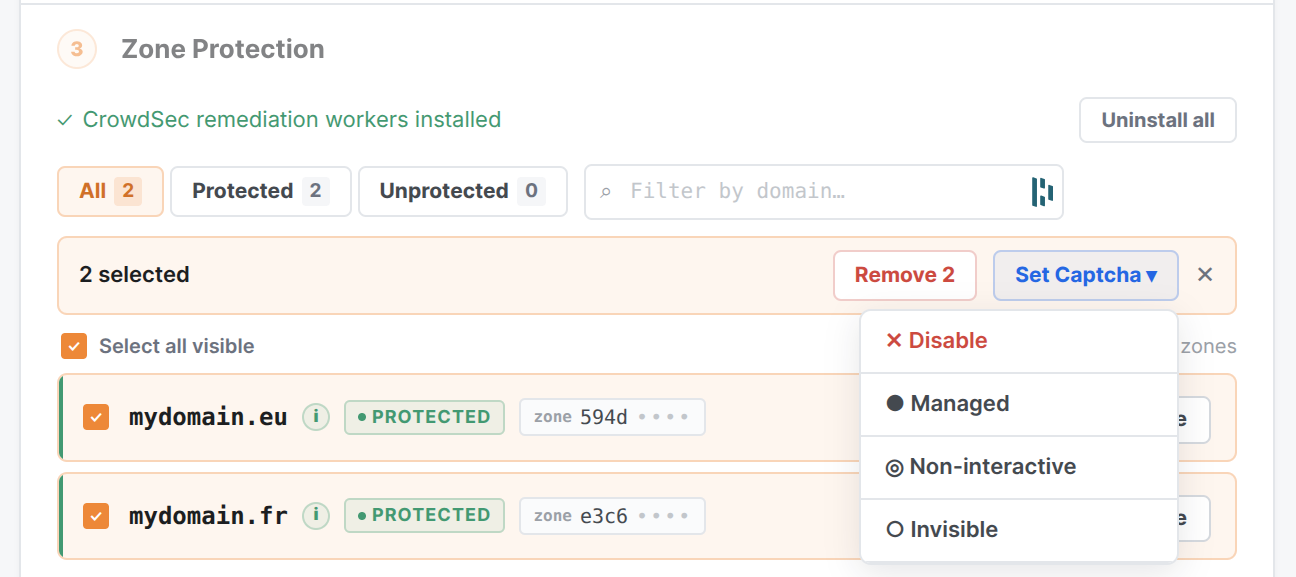
Removing a zone:
Click Remove next to a protected zone to unbind the Remediation Worker from that zone and delete its Turnstile widget. The shared KV namespace and worker scripts remain in place for other protected zones.
Cleaning up all infrastructure:
Click Uninstall all to remove all bouncer infrastructure at once: unbind all zones, delete the shared KV namespace, and remove the worker scripts.
The installer will prompt for confirmation before proceeding.
The uninstall all also removes infrastructure components from older versions of the cloudflare bouncer (D1 database)
CLI Bouncer Setup
The CLI bouncer is a Go binary (crowdsec-cloudflare-worker-bouncer) that manages Cloudflare infrastructure from the command line using a YAML configuration file.
It supports two modes:
- Daemon Mode — the process runs continuously, syncing decisions from your Security Engine to the KV store on a regular interval. Workers and KV are cleaned up automatically when the daemon stops.
- Autonomous Mode — the process deploys the Sync and Remediation Workers once and exits. All subsequent decision syncing is handled by the Sync Worker inside Cloudflare on a cron schedule.
Installing the CLI Bouncer
From CrowdSec Repositories
Packages for crowdsec-cloudflare-worker-bouncer are available on our repositories:
- Debian/Ubuntu
- RHEL/Centos/Fedora
sudo apt install crowdsec-cloudflare-worker-bouncer
sudo yum install crowdsec-cloudflare-worker-bouncer
Then set up the bouncer:
- Daemon Mode
- Autonomous Mode
# Auto-generate config from your Cloudflare tokens
sudo crowdsec-cloudflare-worker-bouncer -g <TOKEN1>,<TOKEN2> -o /etc/crowdsec/bouncers/crowdsec-cloudflare-worker-bouncer.yaml
# Review config and set crowdsec_config.lapi_key
sudo vi /etc/crowdsec/bouncers/crowdsec-cloudflare-worker-bouncer.yaml
# Start the daemon
sudo systemctl start crowdsec-cloudflare-worker-bouncer
# Auto-generate config from your Cloudflare tokens
sudo crowdsec-cloudflare-worker-bouncer -g <TOKEN1>,<TOKEN2> -o /etc/crowdsec/bouncers/crowdsec-cloudflare-worker-bouncer.yaml
# Review config and set crowdsec_config.lapi_key
sudo vi /etc/crowdsec/bouncers/crowdsec-cloudflare-worker-bouncer.yaml
# Deploy workers to Cloudflare and exit — no daemon needed
sudo crowdsec-cloudflare-worker-bouncer -S -c /etc/crowdsec/bouncers/crowdsec-cloudflare-worker-bouncer.yaml
In autonomous mode the Go process deploys the configuration to Cloudflare and exits. All decision synchronization is handled by Cloudflare scheduled workers.
Configure your origin server to emit real visitor IPs rather than Cloudflare IPs in logs, so CrowdSec can function properly. See Restoring original visitor IPs.
If the bouncer is not installed on the same machine as LAPI, set crowdsec_config.lapi_url and crowdsec_config.lapi_key in the configuration file.
Run sudo crowdsec-cloudflare-worker-bouncer -d to clean up existing Cloudflare infrastructure before editing the config file.
Manual Installation
Download the latest release.
- Daemon Mode
- Autonomous Mode
tar xzvf crowdsec-cloudflare-worker-bouncer.tgz
cd crowdsec-cloudflare-worker-bouncer/
sudo ./install.sh
sudo crowdsec-cloudflare-worker-bouncer -g <TOKEN1>,<TOKEN2> -o /etc/crowdsec/bouncers/crowdsec-cloudflare-worker-bouncer.yaml
sudo vi /etc/crowdsec/bouncers/crowdsec-cloudflare-worker-bouncer.yaml
sudo systemctl start crowdsec-cloudflare-worker-bouncer
tar xzvf crowdsec-cloudflare-worker-bouncer.tgz
cd crowdsec-cloudflare-worker-bouncer/
sudo ./install.sh
sudo crowdsec-cloudflare-worker-bouncer -g <TOKEN1>,<TOKEN2> -o /etc/crowdsec/bouncers/crowdsec-cloudflare-worker-bouncer.yaml
sudo vi /etc/crowdsec/bouncers/crowdsec-cloudflare-worker-bouncer.yaml
sudo crowdsec-cloudflare-worker-bouncer -S -c /etc/crowdsec/bouncers/crowdsec-cloudflare-worker-bouncer.yaml
From Source
Requires Go >= 1.23
- Daemon Mode
- Autonomous Mode
git clone https://github.com/crowdsecurity/cs-cloudflare-worker-bouncer
cd cs-cloudflare-worker-bouncer
make release
cd crowdsec-cloudflare-worker-bouncer-*
./crowdsec-cloudflare-worker-bouncer -g <TOKEN1>,<TOKEN2> -o /etc/crowdsec/bouncers/crowdsec-cloudflare-worker-bouncer.yaml
sudo vi /etc/crowdsec/bouncers/crowdsec-cloudflare-worker-bouncer.yaml
sudo systemctl start crowdsec-cloudflare-worker-bouncer
git clone https://github.com/crowdsecurity/cs-cloudflare-worker-bouncer
cd cs-cloudflare-worker-bouncer
make release
cd crowdsec-cloudflare-worker-bouncer-*
./crowdsec-cloudflare-worker-bouncer -g <TOKEN1>,<TOKEN2> -o /etc/crowdsec/bouncers/crowdsec-cloudflare-worker-bouncer.yaml
sudo vi /etc/crowdsec/bouncers/crowdsec-cloudflare-worker-bouncer.yaml
./crowdsec-cloudflare-worker-bouncer -S -c /etc/crowdsec/bouncers/crowdsec-cloudflare-worker-bouncer.yaml
Daemon Mode
The Go process runs continuously and:
- Creates a Cloudflare Worker and a KV namespace per configured account.
- Creates Worker Routes per configured zone — all matching requests are handled by the worker.
- Periodically polls your Security Engine or Blocklist Integration and updates the KV store with the latest decisions.
- For every incoming request, the Remediation Worker checks the IP, country, and AS against the KV store and applies the matching remediation.
A Blocklist Integration endpoint can be substituted for the Security Engine in the diagram below.
The Workers and KV created by the bouncer are cleaned up from Cloudflare automatically on daemon stop or launch error.
Autonomous Mode
The Go process deploys the infrastructure once and exits. No persistent daemon is needed.
Two Cloudflare Workers are deployed:
crowdsec-cloudflare-worker-bouncer(Remediation Worker) — applies cached decisions to incoming requests.decisions-sync-worker(Sync Worker) — periodically fetches decisions from CrowdSec using Cloudflare scheduled tasks.
Once deployed, the Sync Worker runs on the configured cron schedule and keeps the KV store current.
Resetting Decisions
To reset all decisions in the KV store without redeploying the infrastructure, add a RESET key with value true to the KV namespace via the Cloudflare dashboard. On the next sync cycle the worker will clear all existing decisions and repopulate from CrowdSec.
Metrics
The Remediation Worker writes metric data points to a Workers Analytics Engine dataset, tracking:
- Number of requests processed
- Number of requests blocked
- Number of requests that threw an exception
- Average request processing latency
Since v0.0.18, metrics are stored in a Workers Analytics Engine dataset instead of a D1 database. Make sure your Cloudflare token has Account Analytics: Read permission (see the permissions table). Without it the metric poll returns a 403 and metrics are disabled, but remediation enforcement is unaffected.
If upgrading from an older version, the legacy CROWDSECCFBOUNCERDB D1 database is no longer used and can be deleted manually from the Cloudflare dashboard.
The dataset name defaults to crowdsec_cloudflare_bouncer and can be customized with worker.analytics_dataset.
In Daemon Mode, the running process polls the Analytics Engine SQL API, exposes metrics via Prometheus, and pushes them to CrowdSec for cscli visualization.
In Autonomous Mode, metrics are collected in the Analytics Engine dataset but are not pushed to CrowdSec.
CLI Helpers
Auto Config Generator
Generates a configuration file by discovering all accounts and zones associated with your tokens:
sudo crowdsec-cloudflare-worker-bouncer -g <TOKEN1>,<TOKEN2> -o cfg.yaml
cat cfg.yaml > /etc/crowdsec/bouncers/crowdsec-cloudflare-worker-bouncer.yaml
This only generates Cloudflare-related config. CrowdSec LAPI config must be set manually in the output file.
Using a custom config path:
sudo crowdsec-cloudflare-worker-bouncer -c ./cfg.yaml -g <TOKEN1>,<TOKEN2>
Cloudflare Cleanup
Deletes all Cloudflare infrastructure created by the bouncer:
sudo crowdsec-cloudflare-worker-bouncer -d
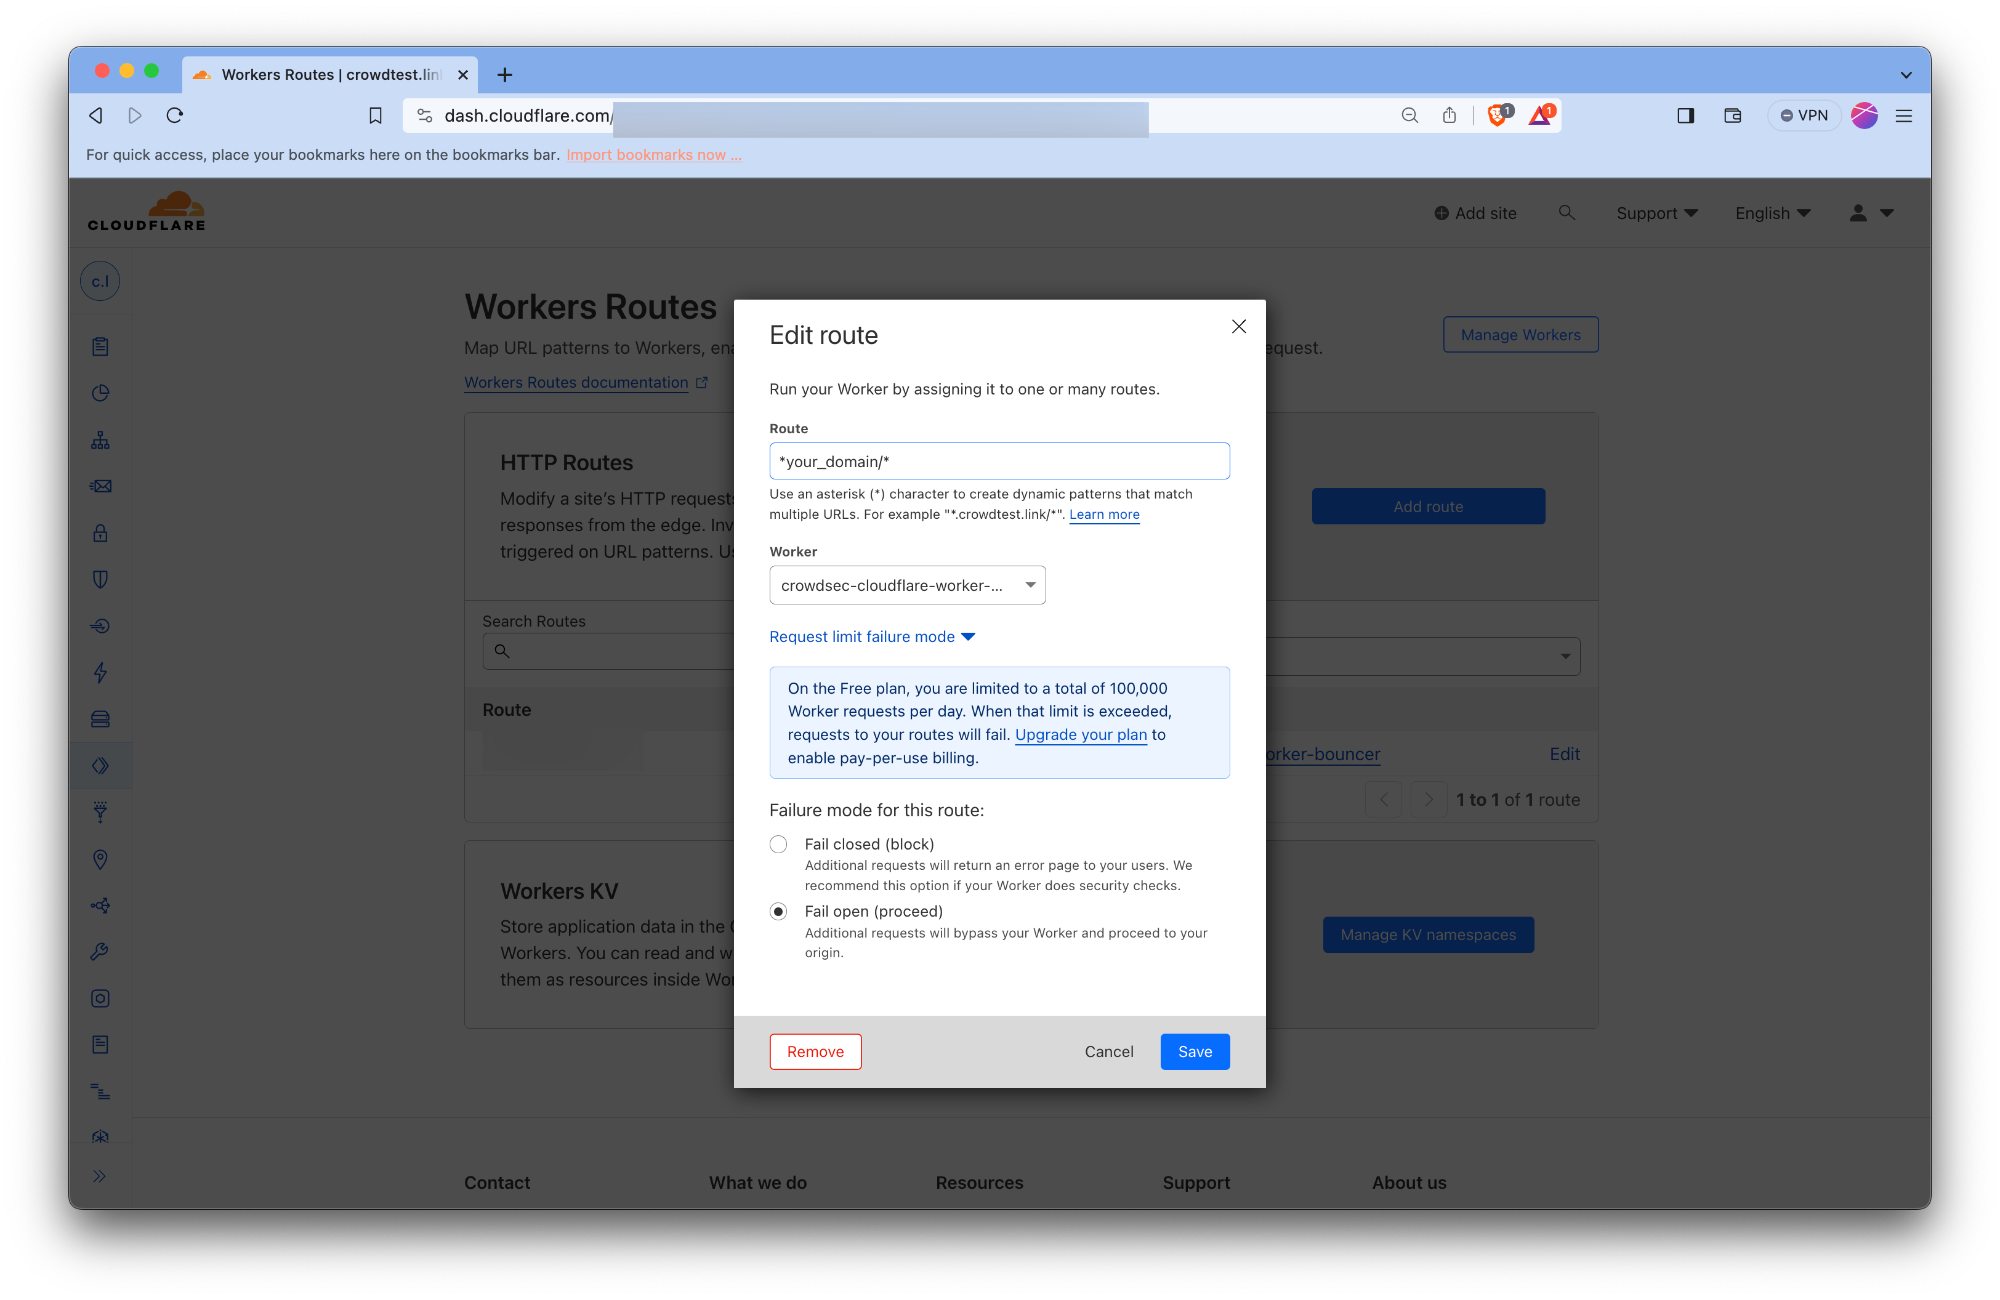
Setting Up the Worker Route Fail Mode
Worker routes are created with Fail Closed mode by default. In this mode, any worker error results in a Cloudflare 1027 error page shown to visitors — including errors caused by plan quota overruns.
There is no public Cloudflare API to change this. We recommend manually switching all bouncer-created routes to Fail Open, so that if the worker encounters an error, traffic bypasses it and reaches your origin server normally.
- Log in to the Cloudflare dashboard and select your account.
- Open the website's Overview page.
- Click Worker Routes in the left menu.

- Click the route created by the bouncer, then click Edit.
- Under Request limit failure mode, select Fail open.
Appendix: Test with Cloudflare Free Plan
Using the free plan is feasible but requires understanding its constraints.
Free Plan Limitations
| Limit | Value | Impact |
|---|---|---|
| KV writes | 1,000 / day | Initial blocklist population is truncated to 1K IPs |
| Worker requests | 100K / day or 1K / min | Heavy traffic may exhaust quota |
The KV write limit is the primary constraint — large blocklists (tens of thousands of IPs) will be truncated on first sync. Incremental updates still flow in over time, so coverage grows gradually.
When the request quota is exhausted, the worker stops applying remediation. This makes setting Fail Open essential — without it your site returns error pages to all visitors once the quota is hit.
Recommended Free Plan Configuration
- Auto-generate config: use the config generator.
- Limit decision sources to your local Security Engine only:
crowdsec_config:
  only_include_decisions_from: ["cscli", "crowdsec"]
- Set Fail Open on all worker routes: instructions above.
- Test with a manual decision:
sudo cscli decisions add --ip 192.168.1.1 --type captcha
sudo cscli decisions list --origin cscli
Within a few seconds the decision appears in the KV store and the remediation is enforced.
Configuration Reference
crowdsec_config
crowdsec_config:
  lapi_key: ${API_KEY}
  lapi_url: ${CROWDSEC_LAPI_URL}
  update_frequency: 10s
  include_scenarios_containing: []
  exclude_scenarios_containing: []
  only_include_decisions_from: []
  insecure_skip_verify: false
  key_path: ""     # TLS client key for LAPI authentication
  cert_path: ""    # TLS client cert for LAPI authentication
  ca_cert_path: "" # CA cert to trust the LAPI certificate

cloudflare_config:
  accounts:
    - id: <ACCOUNT_ID>
      zones:
        - zone_id: <ZONE_ID>
          actions:
            - captcha
          default_action: captcha # captcha | ban | none
          routes_to_protect: []
          turnstile:
            enabled: true
            rotate_secret_key: true
            rotate_secret_key_every: 168h0m0s
            mode: managed # managed | invisible | non-interactive
      token: <CLOUDFLARE_ACCOUNT_TOKEN>
      account_name: owner@example.com
  worker:
    log_only: false
    script_name: ""
    kv_namespace_name: ""
    decisions_sync_script_name: ""
    analytics_dataset: ""
    logpush: null
    tags: []
    compatibility_date: ""
    compatibility_flags: []
    observability:
      enabled: true
      head_sampling_rate: 1.0
      traces:
        enabled: true
        head_sampling_rate: 1.0
  decisions_sync_worker:
    cron: '*/5 * * * *'

log_level: info
log_media: "stdout"
log_dir: "/var/log/"
ban_template_path: ""

prometheus:
  enabled: true
  listen_addr: 127.0.0.1
  listen_port: "2112"
crowdsec_config.lapi_url
string
URL of CrowdSec LAPI. Must be accessible from the bouncer.
crowdsec_config.lapi_key
string
Bouncer API key. Obtain it by running on the LAPI machine:
sudo cscli -oraw bouncers add cloudflarebouncer
crowdsec_config.update_frequency
string (parseable by time.ParseDuration)
How often the bouncer polls CrowdSec. Default: 10s.
crowdsec_config.include_scenarios_containing
[]string
Only include decisions for IPs that triggered scenarios containing one of these words.
include_scenarios_containing: ["ssh", "http"]
crowdsec_config.exclude_scenarios_containing
[]string
Exclude decisions for IPs that triggered scenarios containing one of these words.
exclude_scenarios_containing: ["ssh", "http"]
crowdsec_config.only_include_decisions_from
[]string
Only include decisions originating from these sources.
only_include_decisions_from: ["cscli", "crowdsec"]
crowdsec_config.insecure_skip_verify
boolean
Skip TLS certificate verification for LAPI. Use for self-signed certificates.
crowdsec_config.key_path / cert_path / ca_cert_path
string
Paths to TLS client key, certificate, and CA certificate for mutual TLS authentication with LAPI.
cloudflare_config
accounts[].id
string
Cloudflare account ID.
accounts[].zones[].zone_id
string
Cloudflare zone ID.
accounts[].zones[].actions
captcha|ban
Remediations supported by this zone.
accounts[].zones[].default_action
captcha|ban|none
Remediation applied when a decision's type is not in actions. Set to none to ignore such decisions.
accounts[].zones[].routes_to_protect
[]string
Routes within the zone to protect. Example: ["*example.com/*"]
accounts[].zones[].turnstile.enabled
boolean
Enable Turnstile (CAPTCHA) for this zone.
accounts[].zones[].turnstile.rotate_secret_key
boolean
Automatically rotate the Turnstile secret key.
accounts[].zones[].turnstile.rotate_secret_key_every
string (parseable by time.ParseDuration)
Rotation interval. Example: 168h0m0s (7 days).
accounts[].zones[].turnstile.mode
managed|invisible|non-interactive
Turnstile widget mode. See Cloudflare docs.
accounts[].token
string
Cloudflare API token for this account.
accounts[].account_name
string
Human-readable account name.
worker.log_only
bool
If true, allow all requests but record what would have been blocked in metrics. Default: false.
worker.script_name
string
Name of the Remediation Worker script. Default: crowdsec-cloudflare-worker-bouncer.
worker.kv_namespace_name
string
Name of the KV namespace. Change this when running multiple bouncer instances on the same account. Default: CROWDSECCFBOUNCERNS.
worker.decisions_sync_script_name
string
Name of the Sync Worker script. Change when running multiple instances. Default: crowdsec-decisions-sync-worker.
worker.analytics_dataset
string
Workers Analytics Engine dataset name for metrics. Must match ^[a-zA-Z_][a-zA-Z0-9_]{0,63}$. Default: crowdsec_cloudflare_bouncer.
worker.logpush
bool
Enable log push for the worker.
worker.compatibility_date
string
See Cloudflare compatibility dates.
worker.compatibility_flags
[]string
See Cloudflare compatibility flags.
worker.observability
object
Optional Workers Observability configuration. Omit to leave Cloudflare defaults in place.
observability:
  enabled: true
  head_sampling_rate: 1.0
  traces:
    enabled: true
    head_sampling_rate: 1.0
decisions_sync_worker.cron
string
Cron schedule for the Sync Worker in autonomous mode. Standard 5-field cron syntax.
Examples:
*/1 * * * *— every minute*/5 * * * *— every 5 minutes (default)*/10 * * * *— every 10 minutes
Applies only to autonomous mode. In daemon mode, crowdsec_config.update_frequency controls sync frequency.
prometheus
enabled
boolean
Enable Prometheus metrics endpoint.
listen_addr
string
Address to bind. Example: 127.0.0.1.
listen_port
string
Port to bind. Example: 2112.
Others
ban_template_path
string
Path to a custom HTML template rendered for banned requests. Leave empty to use the default.
log_level
info|debug|error|warning|trace
log_media
stdout|file
With file, logs are written to log_dir/crowdsec-cloudflare-worker-bouncer.log.
log_dir
string
Log directory when log_media is file.
Troubleshooting
- Prometheus metrics:
http://localhost:2112/metrics